
Hi all,
I hope you are enjoying your Friday – the weekend has finally arrived!
Throughout the week, we have found multiple ways to entertain the little munchkins. At LenaChildcare’s setting we try to be as creative as possible, this allows us to have a thousand fun moments to capture and remember but also, provide the little ones with different activities to keep them entertained and that allows them to learn whilst playing!
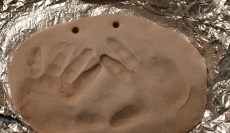
This weeks main focus seems to have been hand-printing on sourdough. This is a little alternative to the usual hand-printing on clay, far too hard for children and even for adults it seems to take a little too long and effort to get it all ready for hand-printing. We decided to look for different alternatives and we came across sourdough! This seemed reasonably easy to make with 3 simple ingredients. Here’s all you need:
- Half a mug of flour
- Quarter of a mug of salt
- Water (slowly add as much as required)
We attempted 3 batches since the first didn’t cook very well, we found our own little recipe that seemed to work perfectly for us:
- Add the flour and salt on a large bowl and add a small amount of water and mix. This should immediately start to make a small bit of dough, then add a little bit more water but don’t be too generous as the dough can quickly become too sticky. Keep mixing and adding water as required.
- Add colouring if you wish – however we found that this made the dough very sticky!!
- Once you get a nice and soft consistency – almost felt like homemade play-dough (a recipe to be shared later on!), this is ready to be rolled into a dough ball.
- Add a sheet of baking paper (or aluminium foil) and pop your dough ball in the centre and roll away. You can make the shape of the dough into a rectangle, oval or a circle. Once complete, it’s time to get to work – better to roll up the little ones’s sleeves!!
- Get their little hands to press on the soft dough and remove once you think the hand-print is deep enough. Grab a pencil and with the back pierce two holes at the top of the dough – this will hold the ribbon so that the parents can hang it if they wish!


- Optional – Write the little ones’s name underneath the handprints with a toothpick.
- Put the dough in the oven (should be on very low, between 50C to 100C) for about 30-50 minutes. If it still feels quite soft instead of hard, leave it in the oven for another 10-15 minutes. Once it feels a little harder, simply turn off the oven and leave the hand-printed sour dough inside to completely dry for another 30 minutes.
- The hand-prints should now be ready to take home!
Don’t forget, take a lot of pictures along the way! Both you and the little ones will have a lot of fun during this activity.
I hope you enjoy!
– Helena
